How to Setup a Successful Touchcard Campaign
US vs. International Sending:
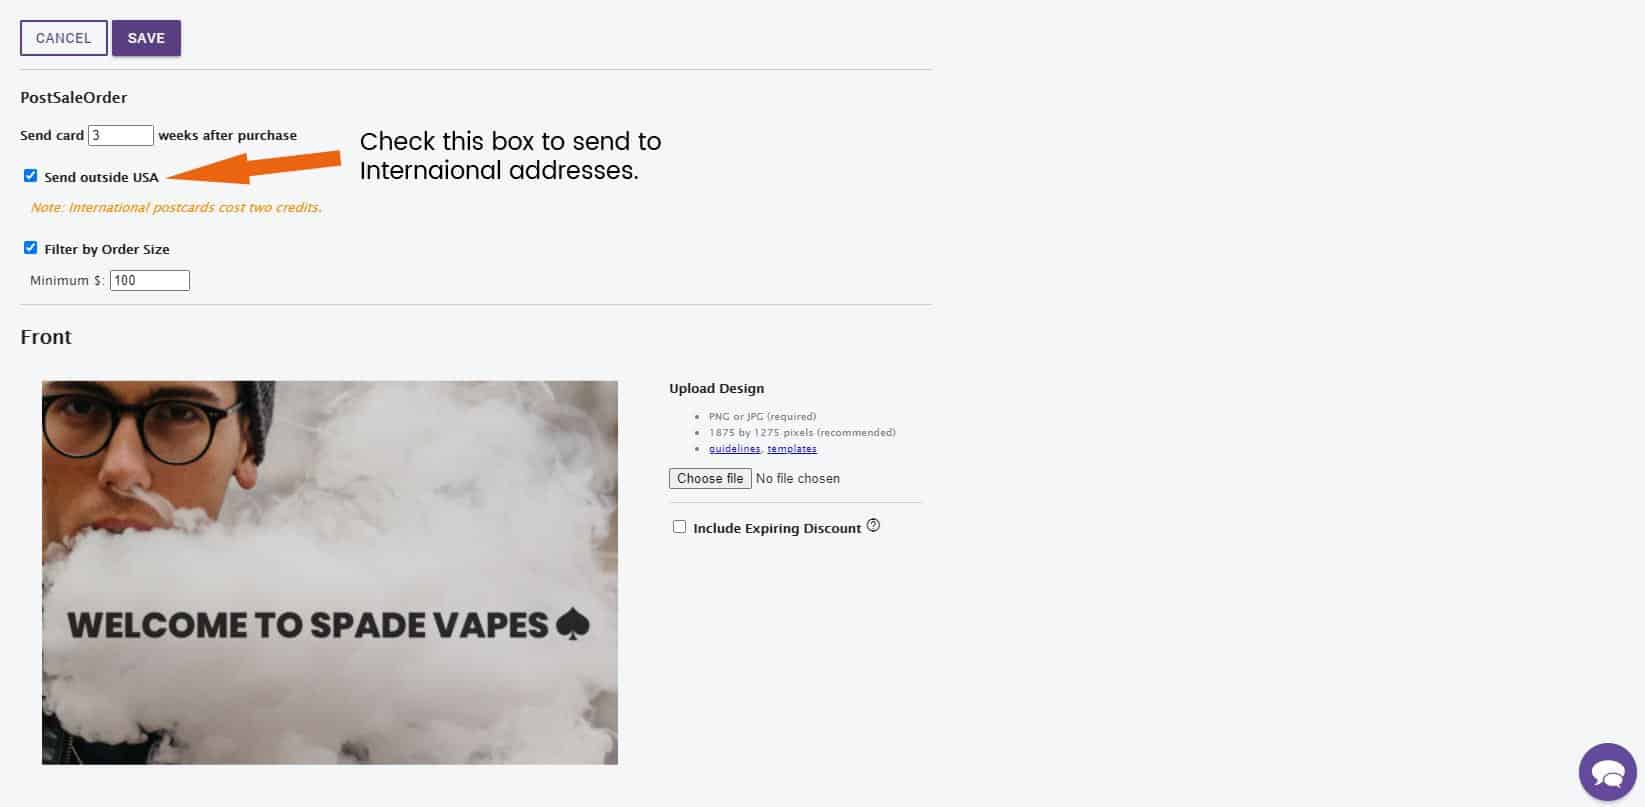
By default, campaigns are set up to send postcards only in the US. However, you have the option of sending to both US and international addresses.
If most of your customers are in the USA , we suggest leaving this setting as the US default.
If the majority of your customers are outside of the USA, you’ll want to turn on international sending.
To do so, just enter the app, click on “Automations” and then “Edit” to edit your setup. You can then check the box that says, “Send outside USA.”
Send Delay:
Send delay allows you to specify when postcards are sent to your customers.
Typically, we suggest having the postcard arrive two to four weeks after the customer receives their order. To achieve this, you’ll want to consider your product fulfillment time when setting your send delay.
To calculate when a customer will receive their postcard, just add one week to the send delay for customers in the USA and two weeks for customers elsewhere.
See below for approximate arrival times:
Send Delay |
Arrival (USA) |
Arrival (International) |
| One week | Two weeks after purchase | Three weeks after purchase |
| Two weeks | Three weeks after purchase | Four weeks after purchase |
| Three weeks | Four weeks after purchase | Five weeks after purchase |
To set your send delay, navigate to the Automations tab, click edit and enter a value where it says, “Send a card X weeks after purchase.”

???? Note: Send delay is calculated in weeks, so entering “2” means a card will be sent two weeks after the initial purchase.
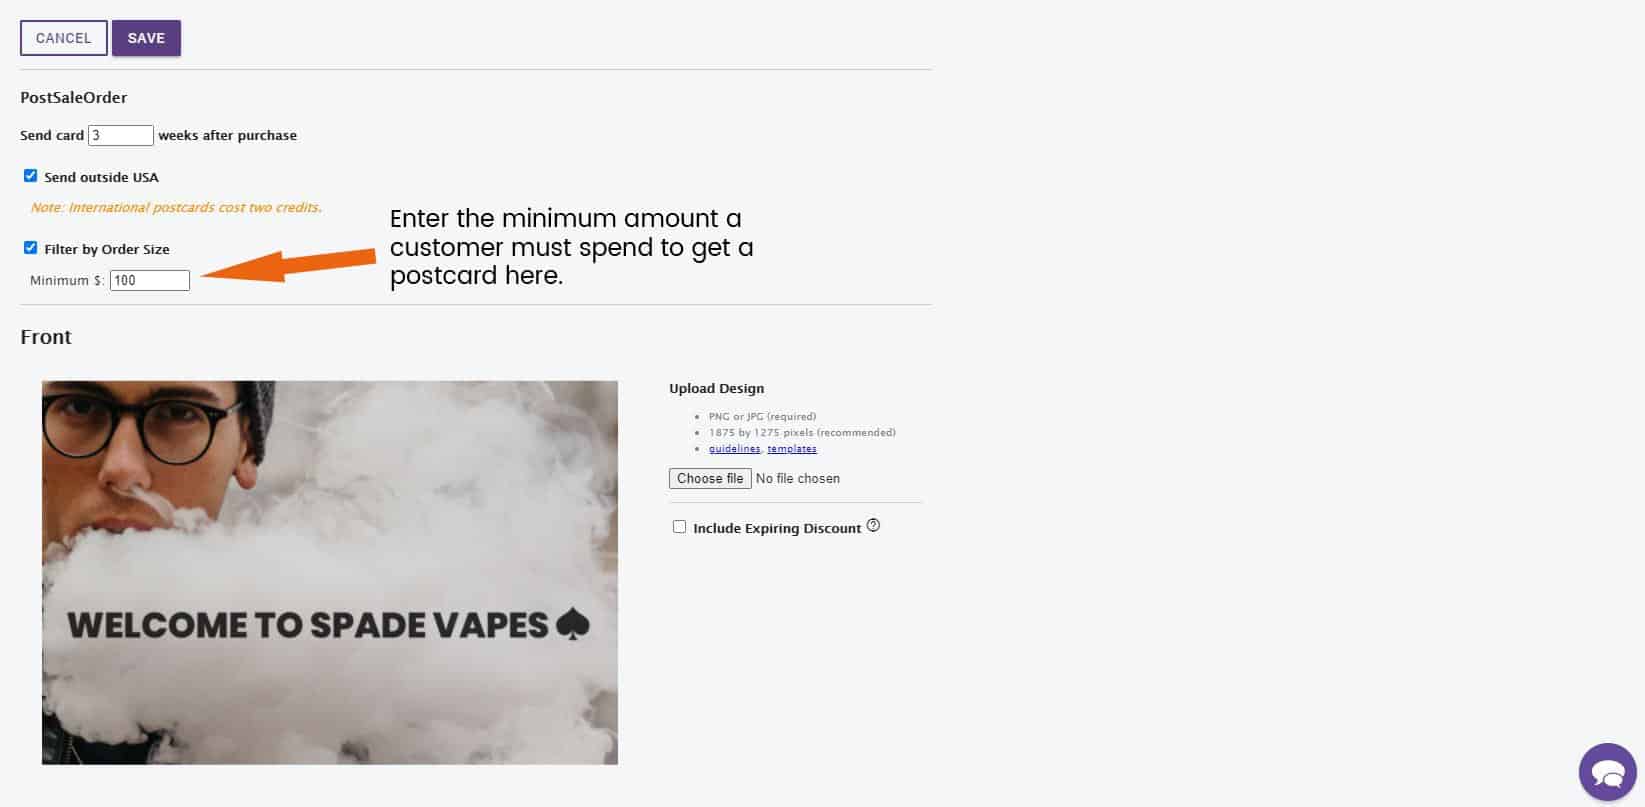
Basket Size Filter:
Basket size filter determines how much your new customers must spend on their first purchase to receive a postcard.
If you set the basket size filter to $100, then every new customer who spends more than $100 on his or her first purchase will receive a postcard.
Deciding where to set your basket size filter:
Adjusting basket size filter up or down can have a significant impact on performance.
There are two ways to set the filter.
✅ Set the filter as high as possible while still allowing yourself to send all of your monthly postcards. Once you have some data you can decide whether to keep it the same or adjust to improve performance or scale positive ROI.
✅ Set the filter at zero and start by sending to all of your customers. If your data shows good ROI at zero, keep it there. Otherwise, start adjusting the filter up to target higher-value customers. Do this until you’re happy with the ROI.
ℹ If you’d like help figuring out where to set basket size filter, email support@touchcard.co and we’ll give you a hand.
To set your basket size filter, go to the Automations tab, click edit, check filter by order size and then enter a value next to “Minimum $:“
Discount Codes:
Touchcard lets you create unique discount codes with dynamically inserted expiration dates that are automatically printed on every postcard.
We highly recommend using this feature. We’ve found that customers who use automated discounts see significantly higher conversion rates than those who don’t.
To set up automated discounts, follow these steps:
✅ Under the Automations tab, click the blue “Edit” button on the postcard image.
✅ Check the box that says, “Include Expiring discount.” next to the side of the postcard you want the discount o appear on.
✅ Enter the discount percentage and weeks until expiration. (Discounts between 15 and 25% convert best.)
✅ Drag and drop the discount code to wherever you want it to appear on the card.
✅ Click “Save” in the top left-hand corner.

???? Note: To account for delivery time, we will add a one week grace period for US addresses and two weeks for international. Therefore, a four week expiration means the discount will expire about four weeks after your customer receives their postcard.
Turn Sending On:
Once you’ve checked out and set everything up, you’re ready to start sending. To do so, click on the Automations tab and toggle the On/Off sending switch to “On.”